I’m proud to brag that many of our farmers are now comfortable with understanding and making changes to their milk access table. This is a small victory for myself, being their FMS Specialist. The milk access table should be evaluated at least once each season, or as you have big shifts in production and free time. I find that reviewing the table can often get lost in the necessary day-to-day tasks and get overlooked for longer periods of time.
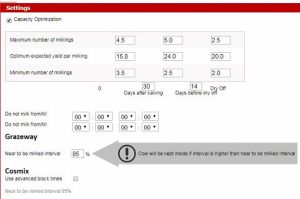
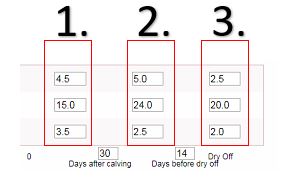 Let’s take a closer look at the table. In order to read the table, you first need to identify where a cow fits in the three columns. The first (1) is for cows between 0-30 days in milk; the second (2) is cows in between 30 days in milk to 14 days before dry off, and the last column (3) is cows 14 days before dry off. You can see that is the case in this example by reading the numbers in the squares at the bottom of the table. Keep in mind, all of these settings are adjustable. Each cow will fall into one of the three columns depending on her stage of lactation.
 Once you determine which column a cow falls under, the first thing you can identify is her maximum number of milkings. Unless a cow has special allowance, like a “milk now” setting, the maximum number of milkings is a hard criterion. If she is a mid-lactation cow (30 DIM to 14 days before dry off), she will not be allowed to exceed five milkings per day in this example.
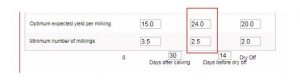
When we move on to looking at the next two criteria, optimum expected yield per milking and minimum number of milkings, these two criteria are read as an “or” statement. In this example, a mid-lactation cow would be let in to milk at the robot 2.5 times a day, or once the robot predicts she will have at least 24 pounds of milk that milking. To make it more tangible for myself, I divide the 2.5 visits per day by 24 hours in the day. By doing so, it tells us that the cow can visit every 9.6 hours, or she can visit the robot sooner than that if she has at least 24 pounds of milk expected. Another way to look at it would be to divide a cow’s daily production by the optimum expected yield to determine her potential for visits. Example: a 110 pound cow divided by 24 pounds per milking would have the potential for 4.1 visits per day on average. For farms that are at capacity, this system allows their high producing cows in to be milked more frequently because they will produce the optimum expected yield per milking faster than the lower producing cows, who will be forced to wait the time limit.
Where to start?
If you’re unsure where to start, a good rule of thumb for the optimum expected yield per milking for mid-lactation animals is usually a third of production. The cows that are less than 30 days in milk typically have more open access because we want to train them that they get feed at the robot and they get milked. Lastly, we tighten up cows 14 days before dry off in order to help them prepare for dry off. I often double check the robot efficiency report to make sure the production level of individual cows makes sense when comparing their visits and refusals. For instance, if the farm is low on free time but I still have 40 pound cows getting milked four times per day, I begin to think there is room to tighten up the milk access table. I can then go into her individual milk visits on her cow card and see if she is getting milked due to the time limit or the optimum expected yield. This will begin to give me an idea of how the table needs to be tightened up.
As always, if you have any questions, don’t be afraid to reach out to your Farm Management Support Specialist for guidance!